
2WD to 4WD Conversion, Part 2
 In the last issue we have gone as far as getting all the parts together and installing the front differential and hubs. We have also installed the wiring to activate the ADD actuator on the front differential. Lets continue where we left off with installing the new transmission.
With the transmission in place we ran into our first problem. You would think that Toyota would use the same frame for both the Prerunner and the 4wd Tacoma, for the most part they do. However, the cross members are not the same design and they are not in the same place on the frame. The Prerunner cross member is an inch further back on the frame versus the 4wd Tacoma.
Because the transmission cross member on the Prerunner is an inch further back than the 4wd version, we had to make a custom cross member. We took the 2wd cross member and cut the ends off.
We then took the center section of the 4wd cross member off so we could use it again in our custom cross member.
We then got some 1” x 3” square tubing and made our custom cross member.
The cross member is now installed with the transmission sitting on it. This install included a Marlin Crawler “Taco Box”, that’s the pretty red thing in between the transmission and the transfer case. We will skip the install of the Crawler in this issue since we are focusing on the 4wd conversion.
Next, install the Transfer case. We used the FJ Cruiser transfer case for this swap since we wanted it to be rugged and simple. The FJ case is a direct bolt in, with the exception of the shifter.
This picture is from a 4Runner we did the same conversion on but I wanted you to see how it looked without the crawler installed. It’s a simple bolt in. Love it.
Once we the t-case in place we set our focus on the drive shafts. Because we had a crawler, it meant making the front drive shaft longer and the rear drive shaft shorter because the crawler box moves the t-case back 8.5″. When you don’t have a crawler you won’t have to do anything to the front driveshaft but you will to the rear drive shaft. This is where we ran into another difference between the frames of the 4wd and the Prerunner. The cross member for the carrier bearing on the rear drive shaft is back 2.5″ more on the 4wd version versus the Prerunner. This requires modifying both sections of the rear drive shaft. The front section of the drive shaft has to be shortened by 2.5” and the rear portion has to be lengthened 2.5″. You cannot use the prerunner driveshaft as it does not have a flange section on the front of it.
Here you can see that when you place the drive shafts so that they will bolt to the rear axle the carrier bearing is now in a different spot between the two.
If you use a crawler box then you can go a different route and use a one-piece drive shaft. Which in my opinion is better anyway, especially if you’re going to be doing any modifications to the rear springs or adding larger tires.
At the back of the transfer case and at the rear diff we used triple drilled flanges, so that if need be, the owner can swap in just about any Toyota drive shaft (as long as it’s long enough) to get him/her back home.
Now that everything is finished down below it was time to put our attention on the interior and finish this build.
Using the FJ case means having to install a shift lever into the cabin. In this case we had a crawler box and twin sticks for the FJ case to install. (For information on the twin stick FJ case see earlier articles)
First we had to take out the console and arm rest. Then, put some holes in the floor where the shifters were going to come up. Here is the one for the Crawler. The one for the t-case will be 9 inches back behind this one.
With the shifters made and installed the only thing left to do is put it all back together again. We wanted to make it so that it looked like it came from the factory that way, so we use leather shift boots for both sets of shifters. The crawler comes up in the slot next to the transmission shifter and the t-case shifters come up in the cup holder.
Last but not least, hook up some indicators to let you know your in 4hi or 4lo. The Prerunner comes with the indicators in the dash already. All you need to do is find the wires that go to each one and hook them up from the T case sensors and your good to go.
With everything all put together it was time to check and see if everything worked as planned. We took it for a test drive and everything worked perfect. You push the switch for the ADD and it engages, then you put the t-case into 4wd and the light comes on in the dash letting you know your in 4wd. Shift the t-case into lo and the indicator comes on as well. Perfection. The way Toyota should have made the Tacoma. With a manual T case.
This swap is not for everyone. It’s neither cheap nor easy to accomplish but for some it is well worth it.
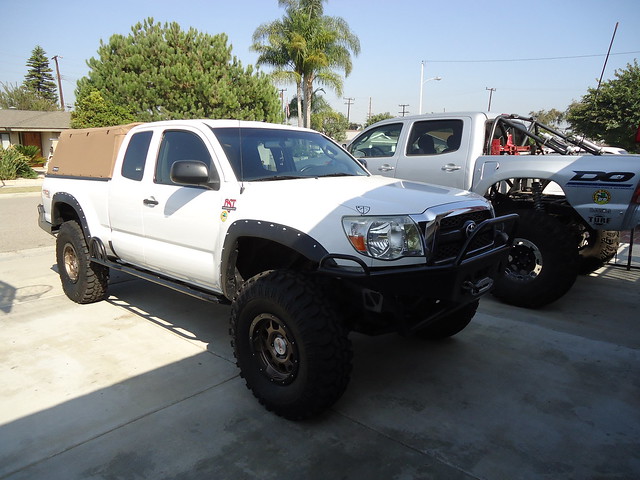
Since this swap the owner of this Tacoma has added larger wheels and tires and has wheeled some pretty good trails with his Tacoma that he would have never been able to wheel while it was 2wd. He can and still drives the truck to work every day showing off his new creation.
For further information on this swap you can contact RockSolidToys at www.RockSolidToys.com
Photos!
[flickr set=72157633191463745]


Remember, tell your friends! They can
subscribe for FREE using this link!
Find Us On: 

{fcomment}
