 You may have seen some of our livestream of the build we accomplished last weeked. I’ve been told that the audio was sub-par so please accept my apologies for that. This build went pretty much as expected and I can’t wait to try out the heater later this summer and into the fall, I really think it will make a huge difference (especially for the little explorers) in the CVT RTT on our Manley Trailer.
Just for comparison, the Propex USA distributor sells the HS2000 heater by itself for $760. Our guess is that the Hotbox kit adds substantially to that cost mainly due to the all aluminum construction and custom fabrication involved.
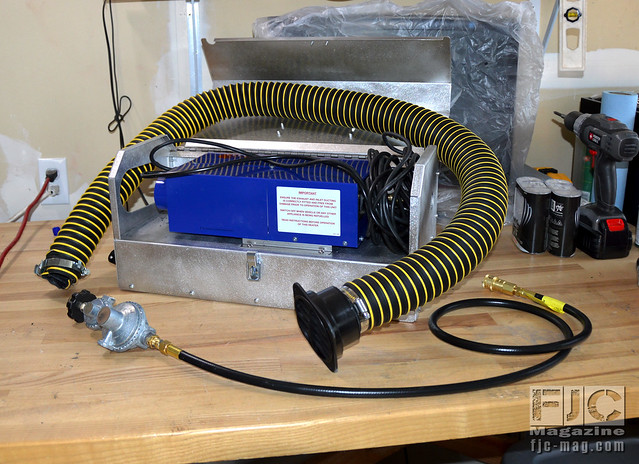
The kit comes very well packaged in one large box, and each of the aluminum pieces are individually wrapped. The hardware is divided among several plastic bags and was 100% accounted for upon inventory. The black & white instructions included with the kit are great, but we prefer the color instructions the guys from A/T e-mailed over.
When assembling the panels with sheet metal screws, I can’t recommend a drill with screwdriver bit enough. It literally saved us a good hour on this build, so make sure you have one on hand. Other required tools are pretty standard items, but make sure you have pipe dope and high-temp silicone before you begin.
While the instructions are complete, they do require you know a little about what’s going on with each step, as some of the minor details are not included for brevity’s sake. The photos aren’t super detailed, but it’s easy enough to figure out how things go together. If you’re used to IKEA style “Insert A into B” instructions, you’ll miss that feature with this kit. It definitely takes a little mechanical know-how to get everything matched up properly.
One note is that one of the first steps in the instructions is to “Time Save” the panels with a scotch guard pad in order to hide blemishes from manufacturing, luckily all new kits from A/T have this done already so you don’t have to worry about it. All edges of the panels need to be deburred and dulled as well, so take the time to prep each panel before moving on.
This kit relies on most of the HS2000 components to get everything setup properly, as a result, working on the intake & exhaust tubing on the bottom of the box is a bit of a pain. They’re not exactly ‘pliable’ and have to be routed exactly as specified.
Once the HS2000 is installed to the box, the final assembly can begin. Again this is an area that a little mechanical know-how is necessary. There is a hinge that must be pop-riveted to the lid & the bottom portion of the case, so getting all these pieces lined up correctly was a little challenging. Luckily I was able to get everything riveted in properly (although I ruined one rivet in the process). The other two items to be riveted to the case were the latch pieces (top & bottom) and the handle for the top. I managed to install the top of the latch upside down, ruining two more rivets & requiring a little drilling to remove.
The minor wiring tasks needed are very easy for even those new to electrical projects, but pay very close attention to the instructions (especially those that come with the HS2000) to make sure you don’t cross wires. The electronics are very sensitive and won’t react well to a backwards connection. Any mistake in this area could be very costly.
The final stage of assembly is the most important: ducting & propane supply. The ducting that comes with the HS2000 is OK but not very sturdy, so A/T provides UV resistant black/yellow ducting to ensure a good supply of warm air for your tent. In order to use these two ducts together though, you must cut & insert the heat-resistant duct to the UV resistant duct. This process took me a good 20 minutes and definitely doesn’t look professional. I plan to replace this duct as soon as I can manage it.
Finally, the gas connections require adapters since the HS2000 is British made & uses different threads than we have in the states. All adapters are included and it’s just a matter of doping the threads & attaching everything. It’s simple but I can’t stress enough the need to leak test all fittings prior to igniting anything. In fact, it’s probably better to have this portion done by a professional.
Overall the kit is well worth the money, we just wish some of the housekeeping type items were done before the kit was packed. Cleaning edged, trimming & prepping tubing would cut off a good 30 minutes from the build and make it much easier for the end user.
We’ll be testing this heater with our little ones this summer & fall, so stay tuned to the website, facebook, and future issues for details on how it’s working.
Source: A/T Overland
More Photos!
Related Articles
[flickr set=72157634938128941]
|
|


{fcomment}