
FJC Mini – Our Powerwheels Project (Part 1)
 Have you tried to find an FJ Cruiser Powerwheels lately?
When the FJ first came out, the black FJC Powerwheels was available at nearly every Walmart, Target, or toy store. Today, there is exactly one listed on Amazon.com and it’s selling for nearly $800. Not exactly a great option. Of course you can, if you look around enough, find a purple & pink “Disney Princess FJ Cruiser”. That’s wonderful if you have a little girl, but our boy just wouldn’t look right rolling around in a pink FJ.
So what does a crazy FJ Daddy do? He buys the Disney Princess FJ Cruiser and mods it, of course. Had I known how much time and effort would go into this project I may not have done it. Ok, I admit it, I totally would have. While it’s been a lot of work so far, transforming the Disney FJ into a mini replica of our ’07 TRD has been a great project even though I may never been done with the mods for this FJ either.
The process started with disassembly. Initially, I planned to just remove the ‘main’ body parts and paint the rest Black Diamond to match our truck. Of course once the screws started coming out, one thing led to another until we had virtually every removable part off of the truck. Luckily all the screws are the same size so they all went into one bin and re-assembly wasn’t too bad.
Our TRD basically has four paint colors: Black, Black Diamond, Anthracite Gray wheels, and White, so it makes sense to finish Brenden’s FJC Mini with the same colors. The mirrors, bezel, and ‘roll bars’ are white. The bumpers, rock rails, dash, windshield, and steering wheel are regular black, and the wheels are Anthracite Gray (see side box). Finally, the body, hood, and doors are black diamond to match our truck.
Side box: Toyota doesn’t have a paint code for the Anthracite TRD wheels on our FJ, so an internet search turned up a Honda paint code that’s close. While Hondas version is a little darker, it certainly closer than anything else available.
The painting process started with sanding all pieces to promote pain adhesion. Painting plastic is always a tricky project so I wanted to ensure maximum coverage. I tried self-etching primer but quickly discovered it’s a little too harsh for plastic, so instead I went for a sandable, fillable standard grey primer for all parts. After one coat of primer and a little wet sanding, all the parts were ready for color.
Since the regular black parts take up the most room, I started with them. I used a flat black Rustoleum paint with an add-on sprayer grip for easier control. Each part got an initial coat, then wet sanding, then a finishing coat. A few parts had to be touched up a little before the two coats of eggshell sealer went on. Overall I think the black parts came out very good, they blend in nicely on the finished truck.
Just like when we painted our parts white (See TRD White Out, April 2009), applying the white to these parts took some effort. For some reason white paint seems to go on a little thicker than others, so it’s very easy to overspray the parts. This meant waiting for it to dry, wet sanding, and repainting. While the black parts only took two coats, all the white parts took three plus a little touch up to get them right.
The OEM colors (for the wheels & body) came from a paint dealer and were much more expensive than standard rattle cans. I painted the wheels first and it was immediately apparent why they cost more: quality. The Anthracite flowed out of the can very well, with no dripping or sputtering that is always a concern with most rattle cans. I probably could’ve gotten away with one coat on the wheels, but had to shoot two to get full coverage in the tighter areas.
The Black Diamond went on very easily as well, although it wasn’t quite as smooth due to larger surface area. After one coat of gray primer and two coats of flat black, I ended up shooting two coats of the Black Diamond and one clear coat just to make sure everything sticks ok. I have no illusions of this paint holding up to the wrath of a toddler, but at least it looks good for now.
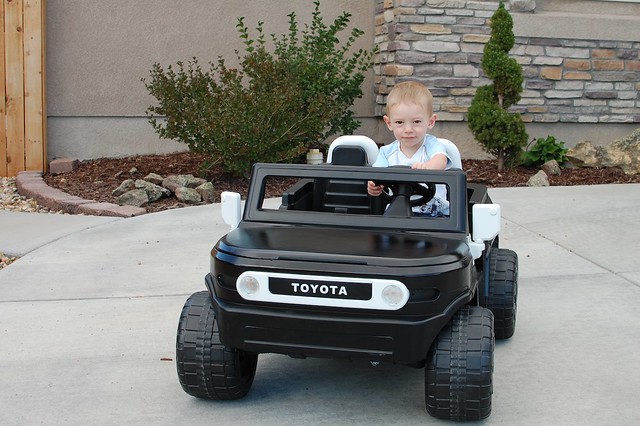
The final step of part 1 of this project was re-assembly. Luckily my good friend (and our newest photographer) Jim was on hand to help sort out the mess of parts and make sure everything went together properly. We ended up scuffing the paint (of course) to reveal some purple, but a little touch up goes a long way. The FJ is now drivable, and while Brenden is a little small to steer AND move, he loves his truck anyway. There is no doubt he’ll get plenty of years of enjoyment out of this FJC Mini.
Of course this project is not done quite yet. I’m still working on a way to make the pink tail lights and side marker lights not look so pink. I’m also planning several ‘enhancements’: Working lights, badging, and of course an iPod Touch based stereo system (just like daddys FJ). Don’t worry, there will be no movie watching while the FJC Mini is in motion. I’m sure these are all just a start, there are plenty of other mods that we’ll come up with in the future. Look for this first round to be completed by the next issue of FJC Magazine!
More Photos!
[flickr set=72157627841898533]
To get your copy of the October 2011 issue of FJC Magazine:

NOTE: Internet Explorer users should right click and select “Save Target As”


